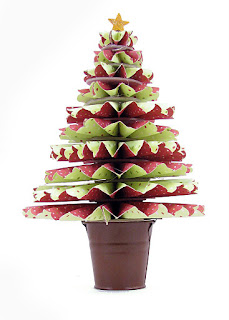
Alexandra whipped this gorgeous tree up last week and shared the instructions with us! This would make a great last minute gift or table decoration!
For the tree, you will need 5 sheets of paper. Cut the papers to the following sizes and then score at 1/2" increments. After they are scored, cut again into the corresponding widths.
12" x 11-1/2" Cut into 3" widths (x2) and 2-3/4" widths (x2)~~ Total of 4 pieces
12" x 9-1/2" Cut into 2-1/2" widths (x2) and 2-1/4" widths (x2)~~ Total of 4 pieces
12" x 7-1/2" Cut into 2" widths (x2) and 1-3/4" widths (x2)~~ Total of 4 pieces
12" x 5-1/2" Cut into 1-1/2" widths (x2) and 1-1/4"widths (x2)~~ Total of 4 pieces
12" x 3-1/2" Cut into 1" widths (x2) and 3/4" (x2) ~~ Total of 4 pieces
Punch 1-3/4" Circles (x8) and 1" Circles (x2) out of sturdy chipboard. (We suggest coloring the circles to blend with the paper.) Then, fan fold the pieces and adhere ends together, making fan-fold medallions. You should have 10 total medallions when done. Using a strong adhesive (Alexandra used a glue gun), start with a 1-3/4" circle and adhere the largest medallion to it. Then, adhere another 1-3/4" circle on top of the medallion. Repeat this process and as you stack, the medallions should decrease in size. The last 2 circles used between the medallions should be 1" in diameter.
For the top of the tree, diecut 2 stars, adhering them to each other. Decorate the stars with Stickles, metallic markers, or glitter.
For an added decorative touch, use a border punch on the paper strips before folding them. Or try making the tree out of dark green cardstock and using white paint or stickles to create snow on the edges! The possibilities with this project are endless!
Tim Holtz even has a version of this tree on his blog this week. Check out his trick for ornaments here: Tim Holtz Blog. His little ornaments for the rosette tree are too cute!
Happy Scrappin'!


No comments:
Post a Comment