Tuesday, January 24, 2012

Glossy, Glossy

One of my most favorite, go-to items is Glossy Accents..Glossy Accents are made by the ink-gods at Ranger.  Glossy Accents are labeled as a 'clear, dimensional embellishment'.  I first discovered Glossy Accents a few years ago, when I was doing a bath-themed layout of my puppy.  I wanted to use some Sticko bubbles on the layout and, after placing the stickers on the paper, I decided I needed the bubbles to really stand out.  A friend pointed me in the direction of Glossy Accents.  I applied them over the bubble stickers, let them dry, and was absolutely amazed at the results.  I had clear, glossy, dimensional bubbles!!  How cool is that?! 

It wasn't until later, after taking a class off of Tim Holtz himself, that I discovered that Glossy Accents also makes a wonderful adhesive.  It is uber-strong and works on heavier elements like plastics and metals.  It works great as a glue on paper as well!  And with it's precision tip, you can also write rather easily with it.  Glossy Accents are definitely a must-have for your scrappy tool box!

Looking to get some Glossy Accents?  Here's a couple of tips:

  • If the tip gets clogged, take a very fine gauged stick pin and slowly stick it in the tip, making sure not to force it.
  • If you use Glossy Accents as a glue and need it to set quick, here's a tip to quick set the item.  For example, say you glued a paper flower onto a tag at a crop and needed to go home....It's not dry yet?  As long as you are not using the Glossy Accents as an embellishment, but as a glue, you can sit on the project for a minute or so..(yes, I said sit).  The heat from your body will quick set the project enabling you to move it or pack it up.  Cool tip huh?  (This tip is from a Tim Holtz class..)
Happy Scrappin'

Friday, January 20, 2012

Design Team Inspiration

Design Team member Joy made this stunning altered tray using the Little Yellow Bicycle's Winter Twig line, blue Kaiser pearls, ribbon, and some glitter cardstock.  Joy got the template for the snowflake from an online image and hand cut the shape out of the white glitter cardstock.  Then, using the Iris folding technique, she layered the Winter Twig papers behind the snowflake, producing a STUNNING pattern. After embellishing with ribbon, she adhered the paper creation to a tin candle plate.  To finish, pearls were added to the points of the snowflake.  What a great addition to any shelf or table during the winter!! 

Stop back by next week  for more projects from the Design Team....Stay warm!! 

Thursday, January 5, 2012

Spirelli Cards with Alexandra


Alexandra is teaching Spirelli cards on January 28th from 12:30-2:30pm for $25. In this class, you will make 5 gorgeous cards using Spirelli technique and because the pictures do not do these cards justice, we've decided to make a quick video showing how fabulous these cards truly are!!

You can now sign up for any class at the Scrapbook Outlet online at http://www.cdwood.com/Classes-s/611.htm If you can't make the class, no worries! Kits, with supplies and instructions, are available for purchase and can be picked up the Monday after the class is held.

Enjoy!

Wednesday, January 4, 2012

Happy New Year!

Happy New Year scrappers!

This year, we are making a resolution to make the time to blog!  Last year, we were crazy busy and forgot about the poor little blog <sadface>.  This year, we are going to post more samples, classes, and tips on this blog.  And we might even have a contest (or two), so make sure you stay tuned to this blog for updates!

We've got a couple of awesome classes scheduled this month.  First off, we have Jen's Cricut Seminar... If you received a Cricut from Santa, or just want to know more about the machine, then Jen's class is for you!


Learn everything there is to know about the Cricut with our expert Jen! Learn the basics, create a 2-page layout, 2 cards, glass etching on a mug, vinyl, markers and stamps! Bring Basic Tool Kit and your Cricut to class with you and a notepad to take notes. If you have the "When it's Cold Outside" cartridge, bring it along, but if not, you can borrow the store rental. Glass mug for etching, and all supplies are included!  Saturday, January 21, 10-3pm, $40


And next, we have our cardmaking guru, Alexandra, teaching the wonderful art of Spirelli.  If you have never heard of Spirelli, then prepared to be amazed!  You get such fabulous results using this technique.

Learn to create these five stunningly beautiful cards: two hearts, two medallions and an oval, with Alexandra Kimball. Dies used in class are available to order. Bring Basic Tool Kit to class with you as well as foam tape, scotch tape, glue for crystals, and sharp scissors. Saturday, January 28, 12:30-2:30pm, $25.


If you are interested in signing up for these classes, you can register online at: Class Registration

Happy New Year and Happy Scrappin'!!

Wednesday, December 21, 2011

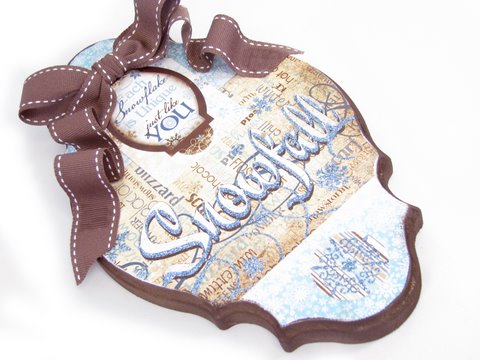
Snowfall Plaque

Design Team member Rachella just turned in her project for this month and boy is it fabulous!  This wood make such a great gift and not just for Christmas....It's great to display all throughout the winter! Instructions and supplies appear below....


Tuesday, December 20, 2011

Medallion Christmas Tree by Alexandra


Alexandra whipped this gorgeous tree up last week and shared the instructions with us!  This would make a great last minute gift or table decoration!
For the tree, you will need 5 sheets of paper. Cut the papers to the following sizes and then score at 1/2" increments. After they are scored, cut again into the corresponding widths.
12" x 11-1/2" Cut into 3" widths (x2) and 2-3/4" widths (x2)~~ Total of 4 pieces
12" x 9-1/2" Cut into 2-1/2" widths (x2) and 2-1/4" widths (x2)~~ Total of 4 pieces
12" x 7-1/2" Cut into 2" widths (x2) and 1-3/4" widths (x2)~~ Total of 4 pieces
12" x 5-1/2" Cut into 1-1/2" widths (x2) and 1-1/4"widths (x2)~~ Total of 4 pieces
12" x 3-1/2" Cut into 1" widths (x2) and 3/4" (x2) ~~ Total of 4 pieces
Punch 1-3/4" Circles (x8) and 1" Circles (x2) out of sturdy chipboard. (We suggest coloring the circles to blend with the paper.) Then, fan fold the pieces and adhere ends together, making fan-fold medallions. You should have 10 total medallions when done. Using a strong adhesive (Alexandra used a glue gun), start with a 1-3/4" circle and adhere the largest medallion to it. Then, adhere another 1-3/4" circle on top of the medallion. Repeat this process and as you stack, the medallions should decrease in size. The last 2 circles used between the medallions should be 1" in diameter.
For the top of the tree, diecut 2 stars, adhering them to each other. Decorate the stars with Stickles, metallic markers, or glitter.
For an added decorative touch, use a border punch on the paper strips before folding them. Or try making the tree out of dark green cardstock and using white paint or stickles to create snow on the edges! The possibilities with this project are endless!
Tim Holtz even has a version of this tree on his blog this week. Check out his trick for ornaments here: Tim Holtz Blog.   His little ornaments for the rosette tree are too cute!
Happy Scrappin'!

Wednesday, December 7, 2011

Free Project! Sunshine & Silver Tissue Box Cover

Sunshine & Silver Tissue Box Cover
by Joy Blevins, Design Team Member at the Scrapbook Outlet

Materials List: 


Instructions:
  1. Paint entire outside of tissue box and let dry completely. (Americana "Golden straw") (Paintbrush)
  2. Top - cut 9-3/4" x 4-/8" rectangle (A) (this allows 1/8" of the box to show)
  3. Holding this rectangle on the top of the box, flip the whole thing over.
  4. Using a pencil, trace the center hole and cut out 1/8" LARGER than the hole you traced.
  5. Long sides (B) cut two 9-5/8" x 2-1/2"
  6. Short sides (C) cut two 5" x 2-1/2"
  7. Chalk or ink all edges in brown, including the inside hole.
  8. Using glue runner (cover fairly completely, especially the edges) or tacky glue. Use a thin layer of this, being sure to glue clear to the edges. Use your bone folder to smooth the paper as you put it on the box, working out the center to avoid bubbles. Glue top (A) and sides (B and C) to the box, leaving about 1/8" of the box showing around all edges.
  9. Using a stiletto or large needle, punch holes in both top comers of all four sides.
  10. Apply a strip of glue on the upper edge of the paper.
  11. Begin placing the stretch lace 3/4" from the left side and wrap around the box, stretching slightly and pressing it into the glue as you go. When you get to the end, cut lace 3/4" longer than needed, fold it under and glue it.
  12. Place a brad through the lace into each hole. Open them on the inside and press them flat with your bone folder.
  13. Using "Walk in my Garden" Cricut cartridge, page 90, create the flower blackout making one flower each in sizes: 3-1/2", 3", 2-1/2", 2", 1-1/2" and 1". Chalk or ink the edges of each flower.
  14. Using something round (I used the ball end of my small hammer, the end of my Cricut spatula and the end of an ink pin), and a 3" or larger square of stiff foam, place each flower upside down on the foam and press the round object on each petal, using a rotating motion.
  15. After you've done each petal, turn it over and do the middle in the same way.
  16. On the top right of the box, using 1/2" glue dots or tacky glue, layer 4" silk flower and the flowers you just made beginning with the largest one, shifting each layer so that you can see the petals on the layer below. Place the 2-1/2" shimmery flower between the layers of flowers.
  17. When you have all the flowers glued down, put some tacky glue in the center of the flower and drop ten red seed beads in a circle.
  18. Using "Plantin School Book" Cricut cartridge, page 76, use the flower to make two flowers each in sizes: 1-1/2" and 1-1/4" and one flower in size 1". Chalk or ink the edges of each flower.
  19. As in step 14, round the flower petals all on the right side and the center of the flower so that they form a cup.
  20. Use tacky glue in the center of the flowers, beginning with the largest one, shifting each layer so that you can see the petals on the layer below. They will form a cupped flower.
  21. When you have all the flowers glued down, put some tacky glue in the center of the flower and drop eight gold seed beads in a circle.
  22. Using "Plantin School Book" Cricut cartridge, page 76, use the shift to make three leaves in size 2-1/2" and two leaves in size 1-1/2".
  23. Using your swirl stamp and the olive green ink, stamp each leaf and then chalk or ink the edges.
  24. As in step 14, round the front side of the leaves and pull the tool toward the point to elongate the circle so it looks like a leaf.
  25. Nestle them into the edge of the large flower and glue them down with tacky glue.
  26. Glue the leaves on using tacky glue or glue runner.
  27. To make the butterfly, use two 1-7/8" x 1" scraps of paper. Use a punch, decorative scissors, or freehand the decorative edge of the wings. 
  28. Cut at an angle leaving 7/8" in the middle. Fold up 1/8" of the middle. 
  29. Glue these two 1/8" pieces together, one on top of the other. Cut a 1-1/8" x 1/4" tube for the body and a 1/4" circle for the head. 
  30. Chalk wings, body and head. Using tacky glue, glue the wings to the box at the middle section only. 
  31. Glue the body onto the middle section. Draw two antenna on the box and then glue the head on.